
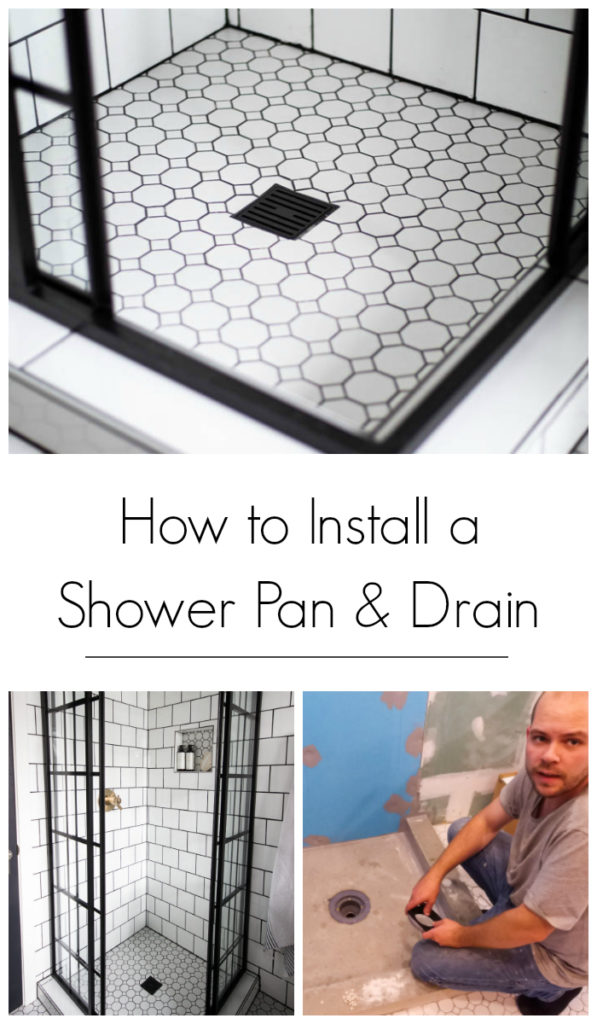
If you’ve been following along, then you already know that we’ve been enjoying our newly renovated bathroom for a while now. We are finally getting around to sharing the details of the shower drain and waterproofing system we used. We have a great local tile store, Tile Ideal, that carries the Übau Flo Shower System from Uber Tile. When I first saw this product I was hooked! It was well thought out, was easy to install, and allowed for a 100% water tight system (as long as you followed all the directions).
How to Install A Shower Pan [& Drain]:
Learning to install a shower pan and shower drain is something that is much easier when you have a visual of exactly what’s going on. We made this video so that we could share the whole process visually, but also provide instructions and information below to help you when you go to install your own.
When planning for our new shower we initially planned to do a curbless shower floor, so we planned for top of the shower pan to be installed flush with the top of the sub floor. However, later we mock installed the shower door glass and we decided that it sat too low, so we changed course and decided to install a curb, therefore raising the glass doors. The tutorial we are sharing in the video will work for you wether you want a curbed or curbless shower.
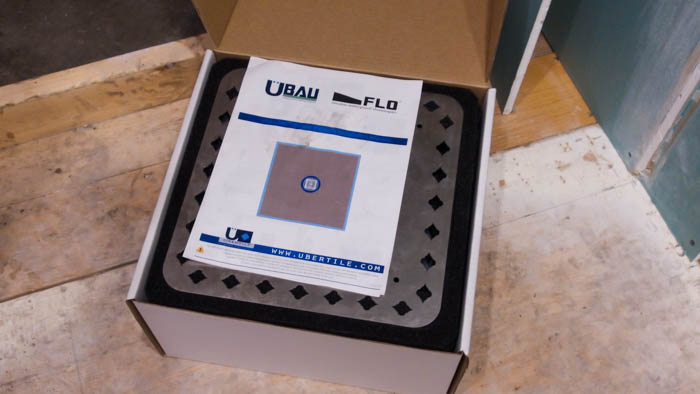
Some of the awesome things about the Übau shower pan, curbs, and niches are that they all comes presloped, meaning that the water all naturally goes towards the drain and you don’t have to slope it yourself, like most other systems. The Übau products also have cementous covering over the styrofoam to ensure a really good bond with the thinset.
Here’s everything you need to pick up to install a shower pan (ours are all from the Übau Waterproof system products):
- Übau Flo Shower pan (36″ x 36″)
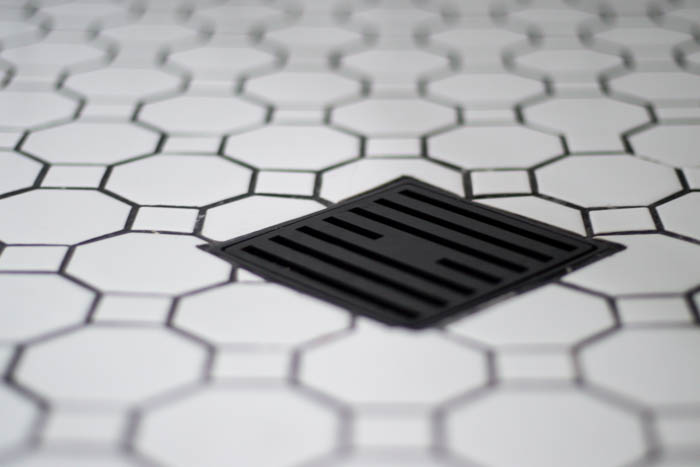
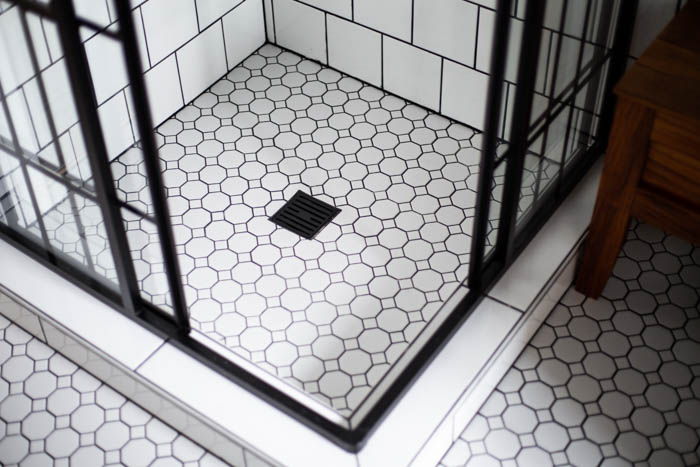
- Übau Flo Drain kit with powder coated matte black drain grate
- Ürobord Wall Panels
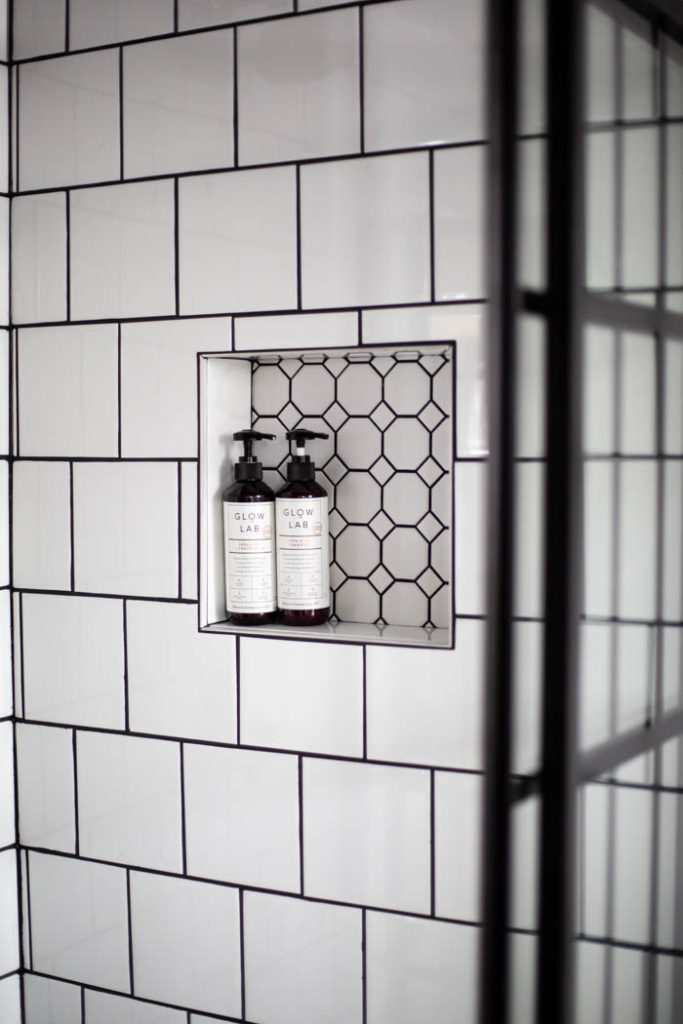
- Übau Flo niche (12″ x 12″)
- Übau Flo sealant
- XPS Screws
- Übau curb
- Thinset
Planning Out Your Shower Pan Installation
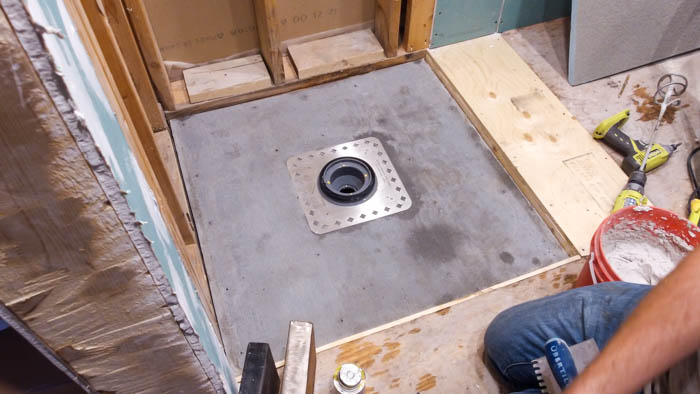
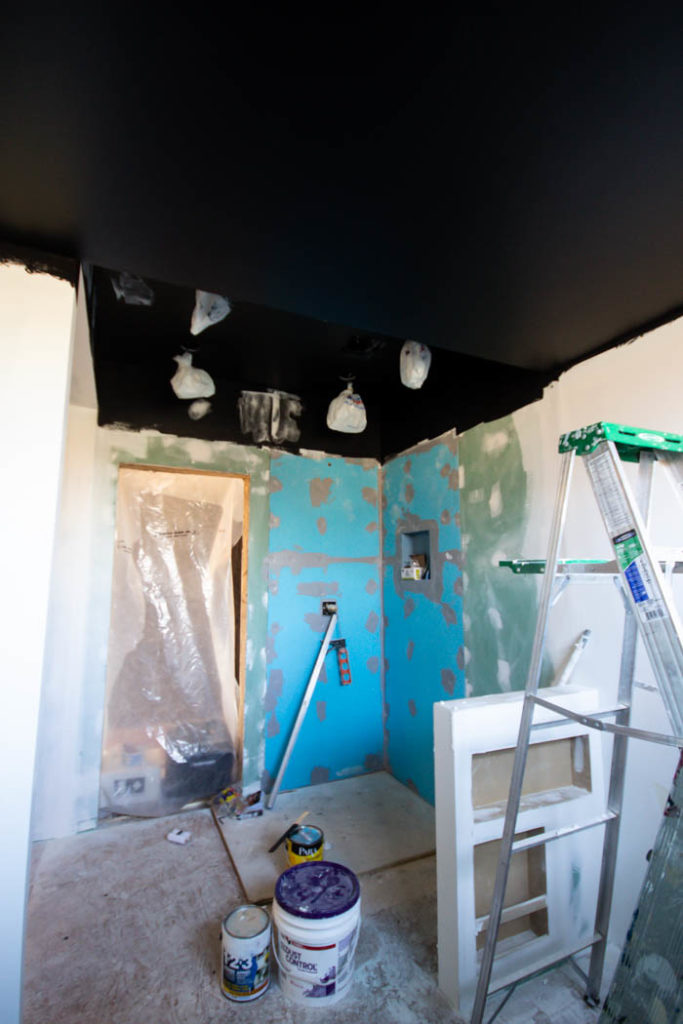
Before we started the install of the shower pan we relocated the drain and vent pipes for the shower drain by chipping out the original concrete and placing the 2″ dia. ABS pipe centered to the middle of the shower pan (we had to move the pipes because this location previously had a bath tub). We then poured new concrete (you will noticed in the pictures we recessed the concrete around the drain to allow for the install of the Übau drain adapter). As we were working off a concrete slab (our house does not have a basement) we also had to take into account the Übau drain adapter, you need to allow for clearance between the top of your sub floor, or bottom of your shower pan, and top of the ABS drain pipe to allow for the drain adapter (refer to the installation instructions for exact measurements). In our case I had to block out approximately a 1-1/2″ deep by 5″ wide circle in the concrete around the ABS pipe – I used a piece of styrofoam foam wrapped in Tuck Tape to do this, which was removed once the concrete set.
Installing Your Drain
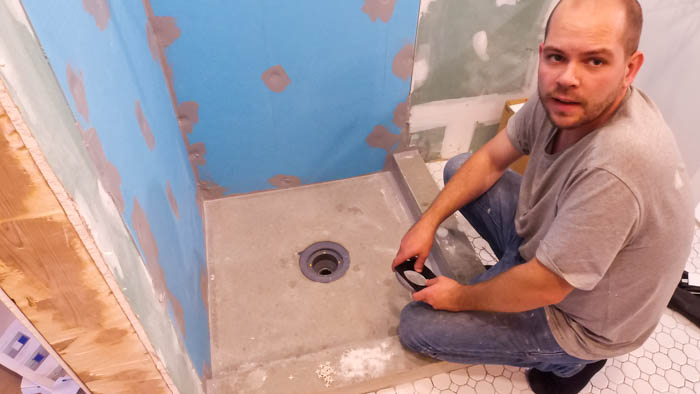
We then prepared to set the shower pan. We had to trim the edges of the pan slightly with a table saw to fit in the corner of the room (so it didn’t interfere with the door opening). Next we made a “shim” out of 2 sheets of 1/2″ thick plywood and 1 piece of 1/2″ thick cement board. This set the top of the shower pan flush with our sub floor. Before installing we cut a hole in the “shim” for the Übau drain adapter. We initially cut a hole in the plywood and cement board and then used the stainless steel support plate and Übau drain to get the exact size and location to ensure it was centered over the ABS pipe in the concrete floor. We then used PL Premium to glue between the concrete and each layer of the “shim”. With the “shim” cut, you can install your stainless steel plate that came in the drain kit.
This step may vary if you are working on a basement/on a concrete slab or on a main/second floor but the install methods are all detailed well in the instructions. With the stainless plate installed you can take your drain adapter and do a dry fit over the ABS pipe. You want to ensure the adapter fits tightly in place. Once you confirm the adapter fits, remove it, apply ABS primer, add glue to the ABS drain pipe and adapter, and install.
Installing Your Shower Pan
Installation of the shower pan may differ slightly depending on the layout of your home. For example, you can install it directly over your sub floor which would result in your shower floor being higher than your bathroom floor, which is fine when you are using a shower curb. In our set-up we have the shower floor level with our bathroom floor. Once we were happy with the layout (we did a couple of dry layouts to ensure the shower pan was lined up correctly with the ABS drain in the concrete floor) we with mixed up some thinset and installed the shower pan.
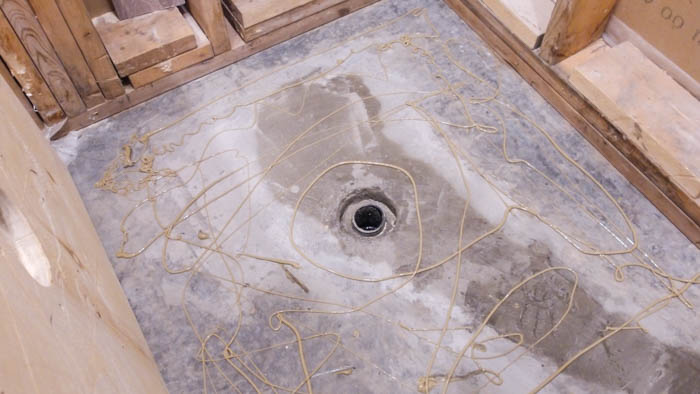
When placing your thinset you want to ensure you pull your trowel in the same direction across the entire face of the floor, this prevents any air from getting trapped under the pan and ensuring a tight bond between the bottom of the shower pan and your floor surface. You can use a square notch trowel for the area around the stainless steel plate and a v-notch trowel for on the stainless steel plate. Ensure you don’t get any thinset on the Übau adapter seal because it would prevent the locking ring from setting correctly.
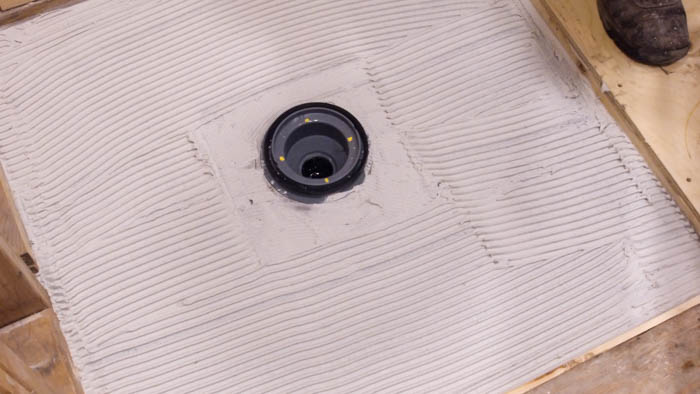
Once the shower pan is in place, take the grease from your drain kit and apply to the rubber seal on the locking ring/adapter. Install your locking ring to secure your shower pan to the Übau ABS adapter. Do not use excessive force (like a hammer) as this will damage the locking ring. You will hear a slight “click” when it locks into place and the paint marks on the adapter and locking ring should line up. With the shower pan in place, put weights on the shower base and let the thinset set for at least 24 hours (or according to manufactures recommendations).

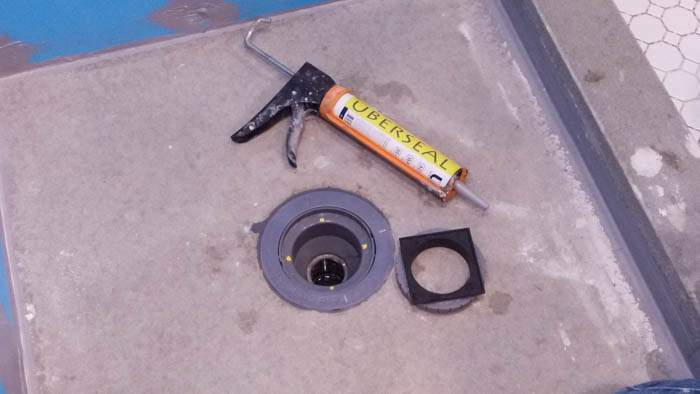
Once the thinset cures you can take the drain and grate assembly and set it in place with the Uberseal sealant/caulking. the grate assembly allows for height adjustment depending on your tile size. There is also some horizontal movement of the grate assembly to allow you to best align the grate to your tile.
Prepping for Waterproofing Boards
With you shower pan installed you can install your curbs if you are going that route. We measured several times, cut, and did a dry layout, once we were happy with the layout we installed the curbs with thinset. You will see that the curbs can be set into the groove of the shower pan, as we were installing the shower pan flush to the sub floor we couldn’t use this feature.
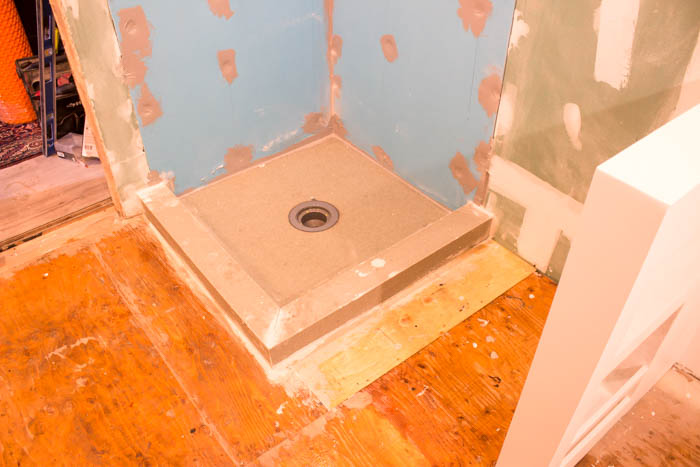
We then proceeded with installing the water proofing board and niche. We cut and installed all the board prior to securing it and using the sealant/caulking. Once we were happy with the fit we screwed down all the boards and the niche. Make sure that caulking is used between all joints and over all screws. We picked up a flat trowel and corner trowel to spread the caulking evenly once applied. Once the caulking is set you can begin tiling!
We couldn’t be happier with how our shower pan went in. The Übau Waterproof system was easy to use and well put together. The instructions were well written and easy to understand. If you are unsure of anything during the installation process the customer service team at Tile Ideal is easy to contact and can help you with any questions you may have. The over-all installation had a very high quality feel and I am sure it will perform well over time. I can’t wait to do my next shower!

If you like how the shower looks, don’t forget to check out our entire MODERN BATHROOM RENOVATION.

Kara
Tuesday 14th of September 2021
I know this post has been here a while, but I love this bathroom! I’m wondering when you tiled the shower curb, did you use a Schluter profile or something similar? Trying to figure this piece out- how to use tile that shows cut edges…
Lindi
Wednesday 15th of September 2021
Yes! That's exactly what we used.