
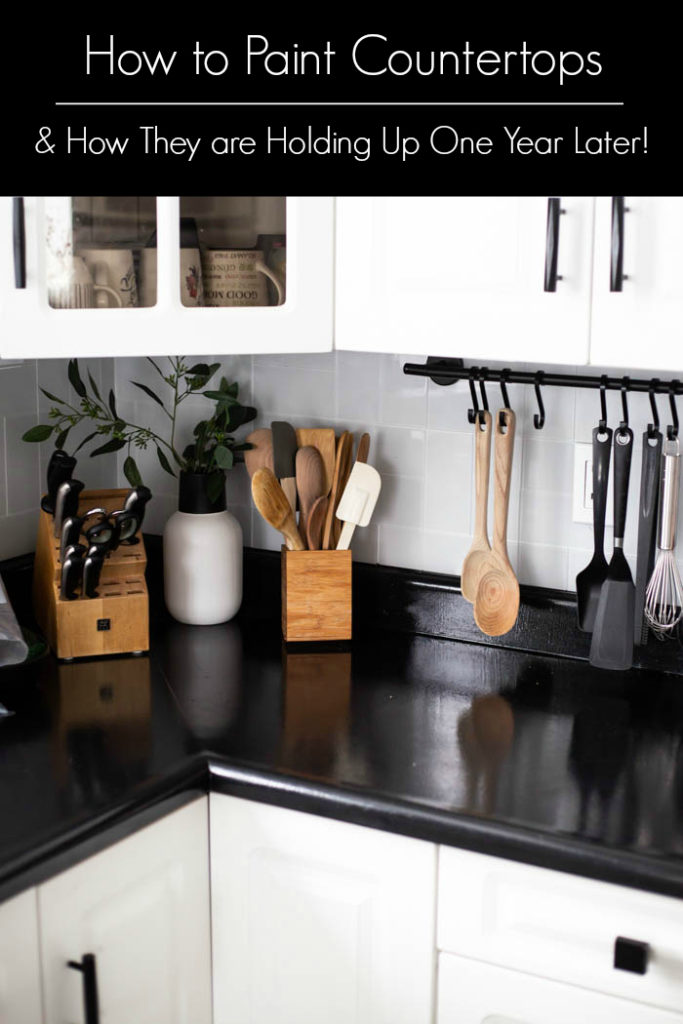
Transform your kitchen, bathroom, or laundry room with beautiful Aspect peel and stick tiles! The backsplash in our modern kitchen was huge transformation! Plus a review and update after one full year of using the tiles in the kitchen!

We do not like cutting corners in our renovations. I mean, no one really likes cutting corners, but we’re the type of renovators that rips out a shower bench seat after it’s set, if it doesn’t look right with the tiles (seriously…. we did that!). My husband especially doesn’t like doing anything the “cheap” way. When I pitched the idea to him of doing a “quick kitchen makeover” and using countertop paint and peel and stick tiles, he was less than thrilled. We did it anyway though! The results were beautiful, and one year later, I’m finally sharing our aspect peel and stick tile review (including how the tile has stood up over the past year!).
*This post may contain affiliate links. When you buy a product through one of my links, I get a commission at no cost to you! Thanks for supporting my blog so I can continue to bring you posts like these. For more info, please see my disclosure page.*
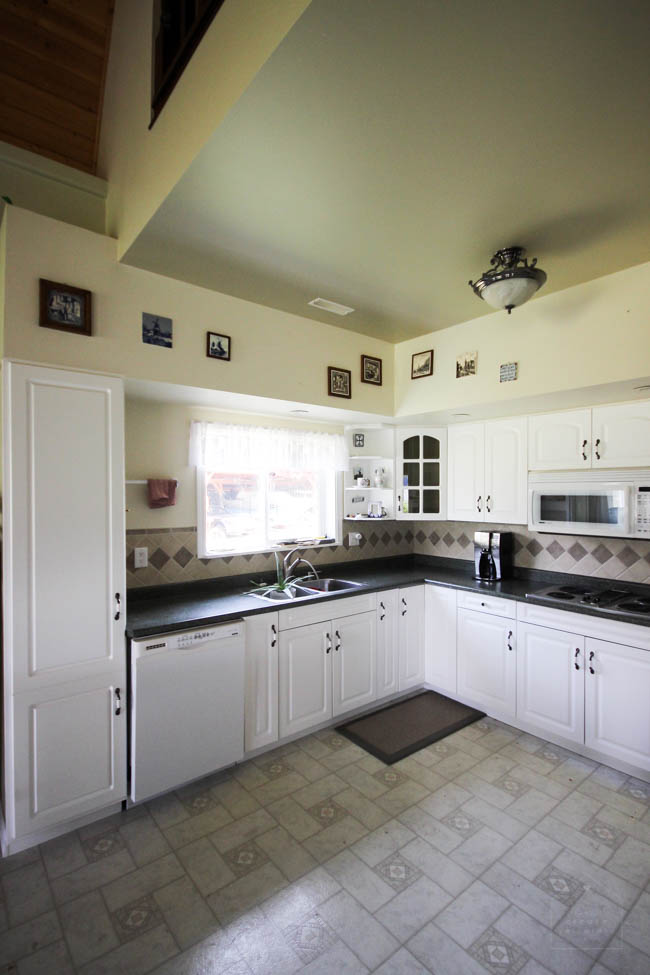
This was our kitchen before the kitchen makeover weekend. We did a few things over the course of two days to complete transform the kitchen, including painting the countertops, changing out all of the hardware, and adding peel and stick tiles in the kitchen. We were very happy with the end results! The peel and stick backsplash was easy to install (but not as easy as we were hoping it would be), and looked great. We’ll share our full review of the Aspect Peel and Stick Tiles (a year later!) below.
What is Peel and Stick Tile?
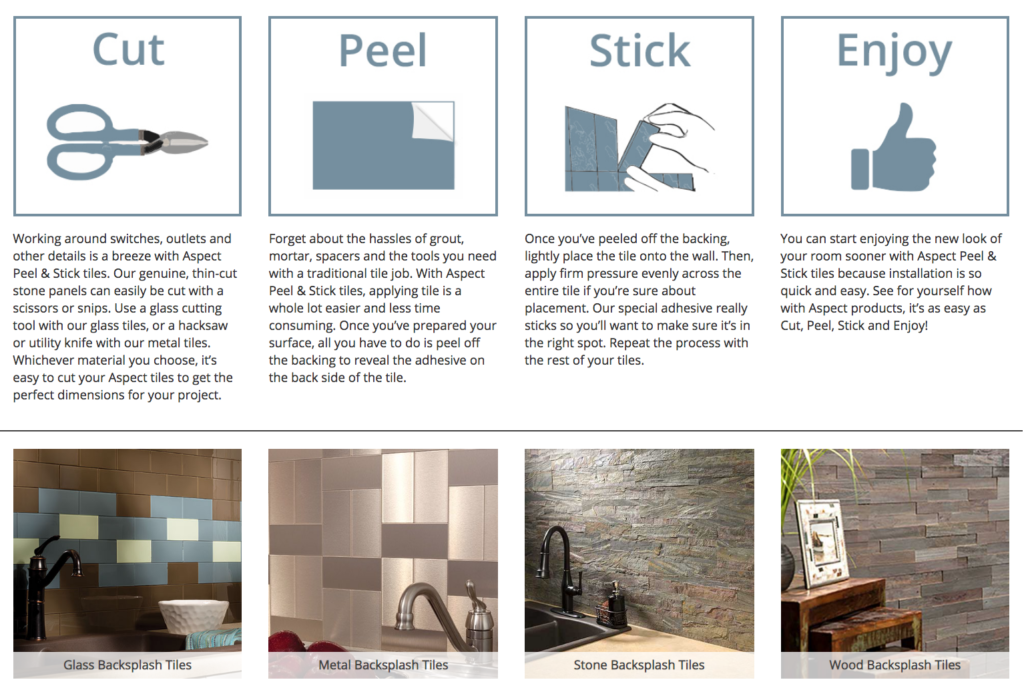
Peel and stick tile is exactly what it sounds like! It’s tile with a backing that simply peels off. Peel the back, and stick the tiles up. The installation is easy. There is no grout or mortar required, and generally they are easier to put up than and to cut than traditional tiles.
The downside is that they cannot be used for all of the same applications as regular tile. They are not made for outside use, or use in areas with heavy water usage, such as showers. But when they can be used, they are a great budget-friendly update!
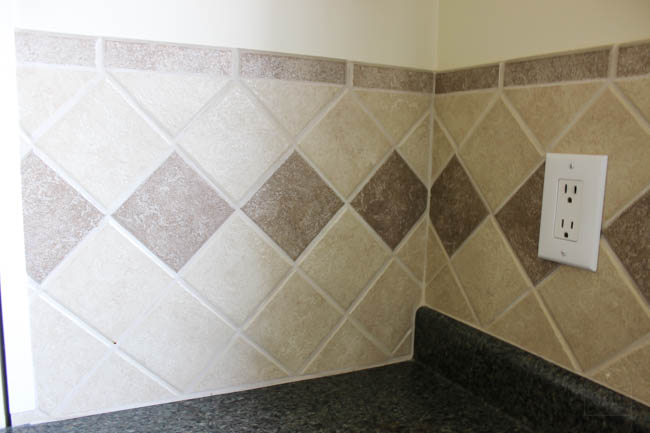
This is the backsplash we had prior to using peel and stick tiles. Because we were using peel and stick, we knew that we could lay our new tiles right overtop of the old ones. Our plan was to add the new peel and stick backsplash right on top of the previous one, and then add a thick layer of silicone overtop to hide the visible gap between the wall and the second layer of tile (old tile + peel and stick tile).
What do you need to Install Peel and Stick Tile?
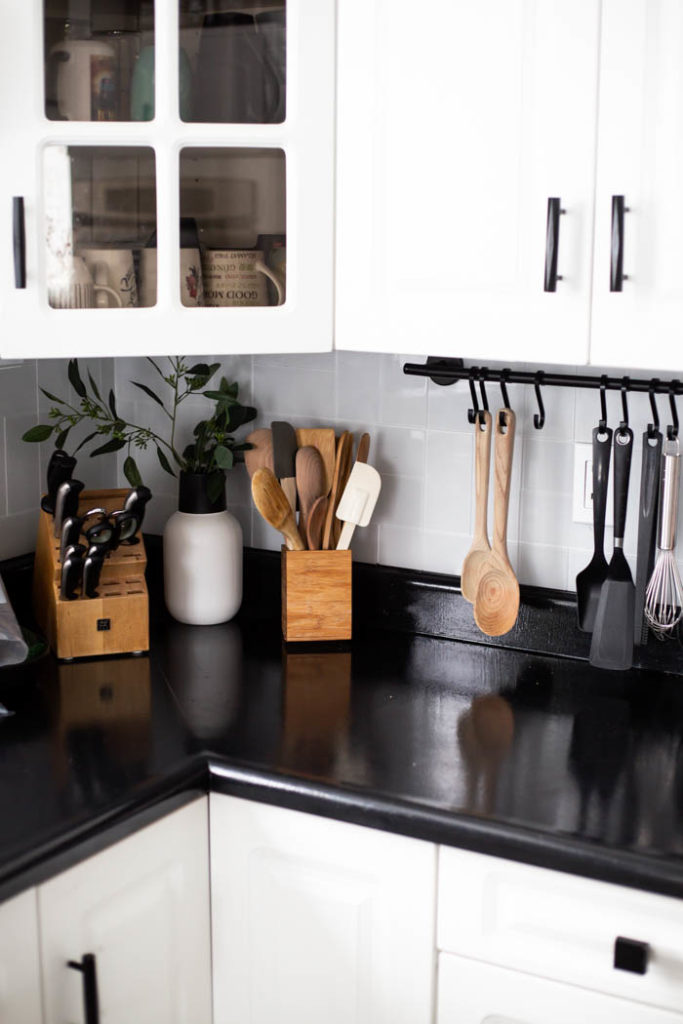
- Peel and Stick tiles of your choice – we used Glass subway tiles in the colour “Frost”
- Primer (possibly tinted)
- Glass tile cutter
- A Polyurethane Tube Adhesive (if you have an uneven surface)
- Wet saw (for the more complicated cuts)
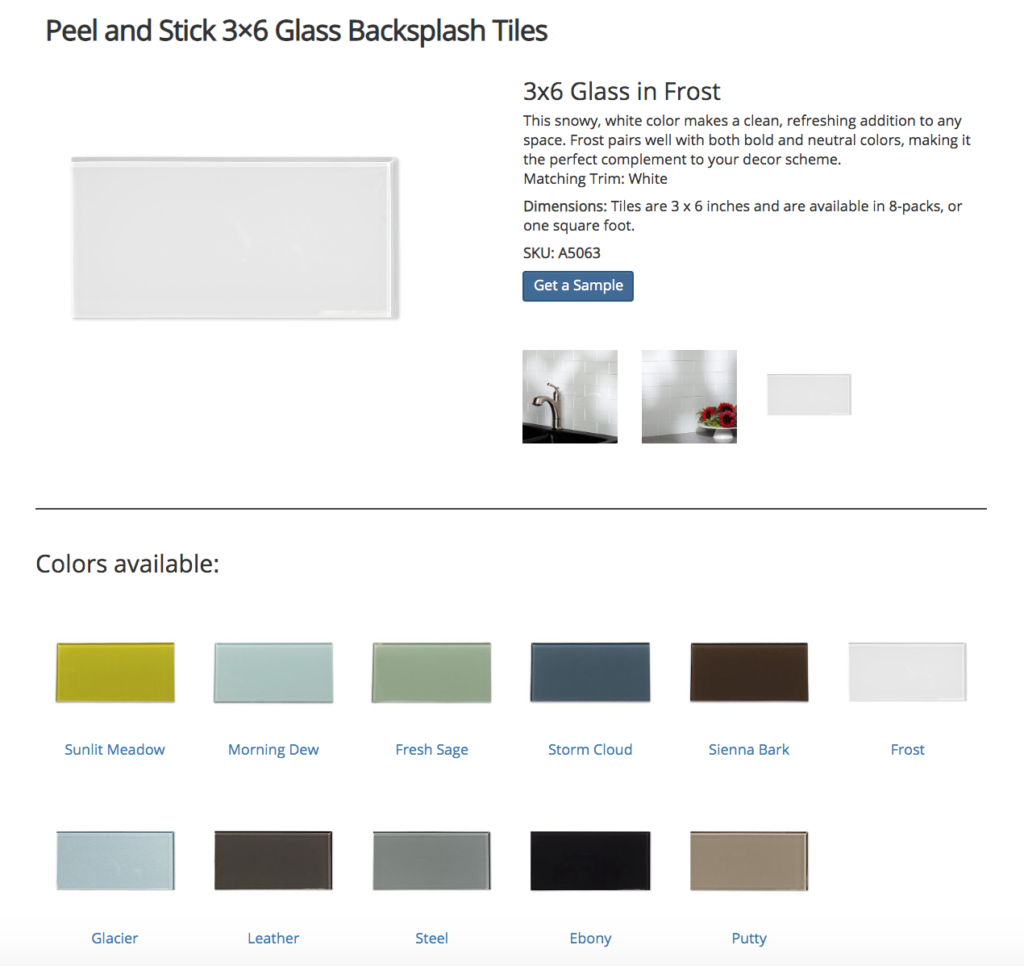
We chose to use the glass subway tiles from Aspect Peel and Stick Tiles. They come in all of the colours shown above. We went for the “Frost”, which I thought was going to be white, but actually turned out to be more of a light grey colour, especially against our white walls and cabinets. In a darker space it may look a bit whiter, but if you’re unsure of how it will look, I recommend picking up some samples and leaving them in the room for a few days to see how the light and colours look together.
What types of Peel and Stick Tiles Can I Buy?
The main types of peel and stick tiles sold by Aspect Tile are Glass, Metal, Stone, and Wood. I’ve only ever used the glass tiles, which require a glass cutter, so I’ll chat about those below, but some of the other options can be cut with just a pair of snips!
How to Install Aspect Peel and Stick Tiles
We worked with Aspect Peel and Stick Tile as part of a weekend renovation project. We wanted a beautiful, modern look on a budget, and this was the perfect way to go! If you would like to see some video tutorials on how install Peel and Stick tile, check out our Kitchen renovation on Instagram.
WATCH THE KITCHEN RENOVATION VIDEO AND HOW WE CUT TILE HERE!
Aspect also shares there own video on how to install peel and stick glass tiles, which you can watch below:
Here’s the steps we followed to install our peel and stick tile backsplash. Your Peel and Stick Tiles will also come with detailed instructions. Always follow the manufacturer instructions and wear proper safety gear.
STEP 1: DECIDE WHERE TO BEGIN/DECIDE ON A LAYOUT
If you just have one straight wall, it’s usually pretty easy to decide where to start your tiles. If you have several walls, choose one outside edge and work your way around. Decide the type of pattern you want to do with your tile. We chose to do a unique square pattern, but overlapping your tiles by half would be a more traditional way to lay subway tiles.
STEP 2: PREPARE YOUR WALLS
You may be placing your tile onto painted drywall or over existing tiles. In either scenario, if your surface underneath is a different colour than your peel and stick tiles, you may want to start by priming your walls. A simple primer over the existing tile, or to cover up the paint, will hide any colour that may show through the gaps. If you are using a darker tile, consider getting a tinted primer for this.
Next, prepare to put down your first layer of tile. Two things to focus on as you start: 1) keeping your tile level on the bottom (our counter was not level going across the side (it was level at the back), and 2) keeping the tile flush with your first edge. You want to keep your tiles level at the bottom, because it will keep your entire pattern level. If there is only a small difference at the first edge, or along the bottom, you can likely fill those gaps with silicone.
STEP 3: CUT TILES
There are two basic tools you need to cut the glass tiles: a glass tile cutter and a wet saw. We had a glass tile cutter that sits on the floor or countertop, but there are also small hand-held versions that you can get. Simply score the tile with the glass tile cutter‘s blade, and then press down to break the tile along the score line. These guys can cut any of your straight lines, as seen in the videos linked above.
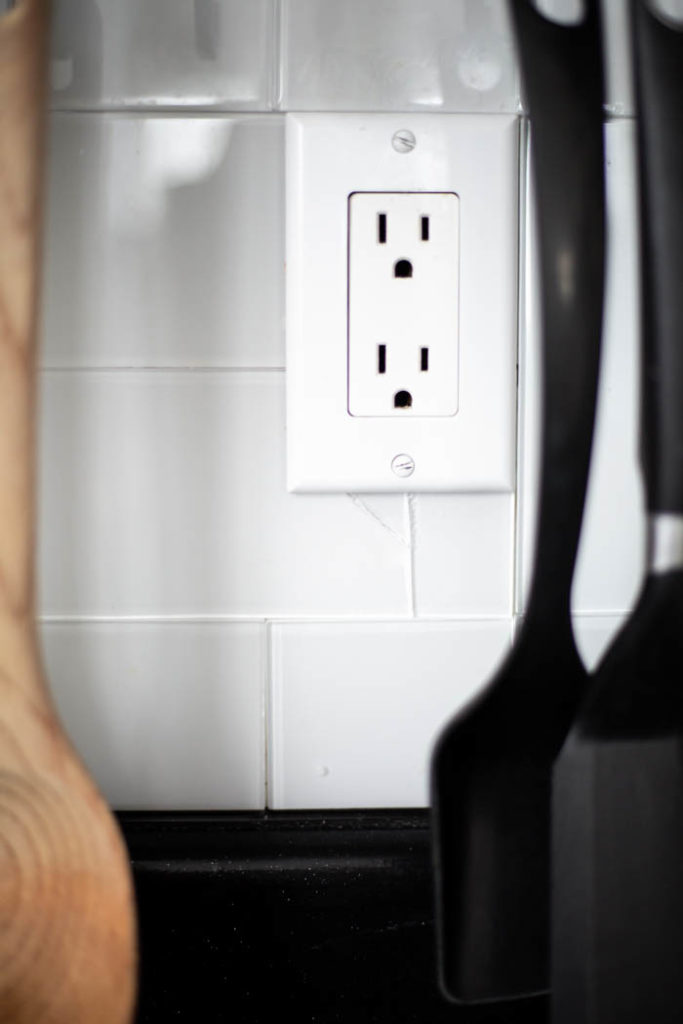
Then, there are a few cuts, like notched ones around outlets or windows that require a more precise cut, or really thin cuts that are too difficult to make with a glass cutter. For those cuts we needed a wet saw with a diamond blade. If you don’t own a wet saw, you can easily rent one from your local hardware store. When we used the wet saw on the glass tiles, we found that often it pushed little tiny shards of glass up underneath the tile. These cuts are usually against edges that will be covered in silicone, or outlets that will be covered with a plate, so it should be fine to adhere them with those little imperfections.
If you do not own a wet saw, it is easy to rent them from your local Home Depot or other hardware stores.
STEP 4: ADHERE TILES
There are two different installation types recommended in the Aspect Peel and Stick Tile Guide. One is simply to peel off the backing and stick the tiles to the wall. The second is to use a polyurethane adhesive. The adhesive is primarily recommended in cases where you have a rough or uneven surface to attach your tiles to. If you are using the adhesive, simple put five pea-sized dots of adhesive on the backs of your tiles and stick them to the wall.
The tiles that we were sticking our new peel and stick backsplash to was fairly smooth, se we opted to just peel and stick. Overall the process was fairly easy and straight forward. As long as you make sure that your initial lines are level and true, all of your future lines should be as well. Although, it is good practice to check once every line and make sure that your lines are still even.
The peel and stick tiles do not require any grout or mortar, which makes them much easier to lay! However, the one disadvantage of no grout lines is that the slight differences in the lengths and widths is pronounced. Usually you can hide slight differences in size by using grout lines to fill the gaps evenly. In the case of these tiles, sometimes you just have to leave a tiny extra bit of space to make sure that your tiles are lined up correctly. This is why it’s important to prime the wall behind the tiles first! You can see exactly what I’m talking about in this Instagram story!
STEP 5: COMPLETE ANY FINISHES
If you are tiling a kitchen backsplash, it is likely that you will want to add silicone along the edges of your tiled backsplash to give it a clean, finished look. When you are done, return all of your outlet covers, and enjoy your new backsplash!
Here’s how the peel and stick tile backsplash looked in our finished kitchen:
We were very happy with the results! As I said above, I did expect the tile to me a little bit whiter, but the light grey still worked beautifully with our overall kitchen design.
Aspect Peel and Stick Tile Review [one year later]
Ok, here’s the part you’ve all been waiting for! How is the tile actually working out? We’ve had the peel and stick backsplash for just over a year now and we’ve been very happy with it. We had hoped that the installation would be a bit faster (i.e. we hadn’t realized we would need a table saw for some of the cuts), but once the tile was installed, we loved it!
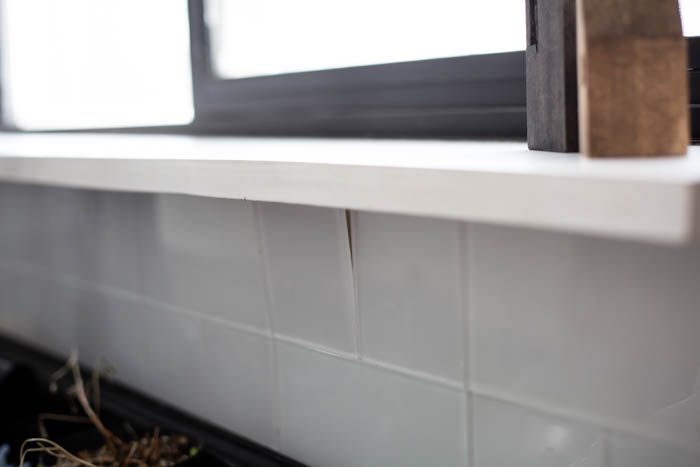
There have been a couple of minor issues that we’ve noticed this year. The first is that we have one tile that got cracked right beside/underneath one of our outlets. The crack was our fault – we tightened the outlet cover too much and cracked it. It would be pretty difficult to replace that tile, since it was a tough cut in the first place. Removing it would only cause more tiles to break, so we’re leaving it for now. Fortunately it’s also behind our utensil rack, so it’s barely ever noticed!
Another problem we’ve had is with one specific tile that just does NOT want to stick on the wall! It’s fallen off a few times, and honestly, I’m surprised it hasn’t broken yet! lol. It would be easy to replace if we had to. Or, if we just used a polyurethane adhesive we could stick it right back on (because we didn’t use it on any of our other tiles). So there are some easy solutions to these problems.
We also haven’t had any trouble cleaning them. We’ve only ever wiped them down. Even behind the stove, they haven’t kept any grease or dirt. They are fairly low-maintenance to take care of!
Would You Use Peel and Stick Tile Again?
Short answer: yes! Real tile, with even grout lines will always look better, and comes in so many more options, but peel and stick tile is a great option for a budget-friendly update like we were doing, or a temporary solution! It was quick to install, has been easy to maintain, and still looks great a year later!
Curious about the Countertop Paint we used? We shared EVERYTHING you need to know about countertop paint!

Steph
Wednesday 29th of January 2020
What did you use to make your sink black?
Lindi
Saturday 1st of February 2020
We bought a sink that was already black and installed it the same weekend we did the tile!