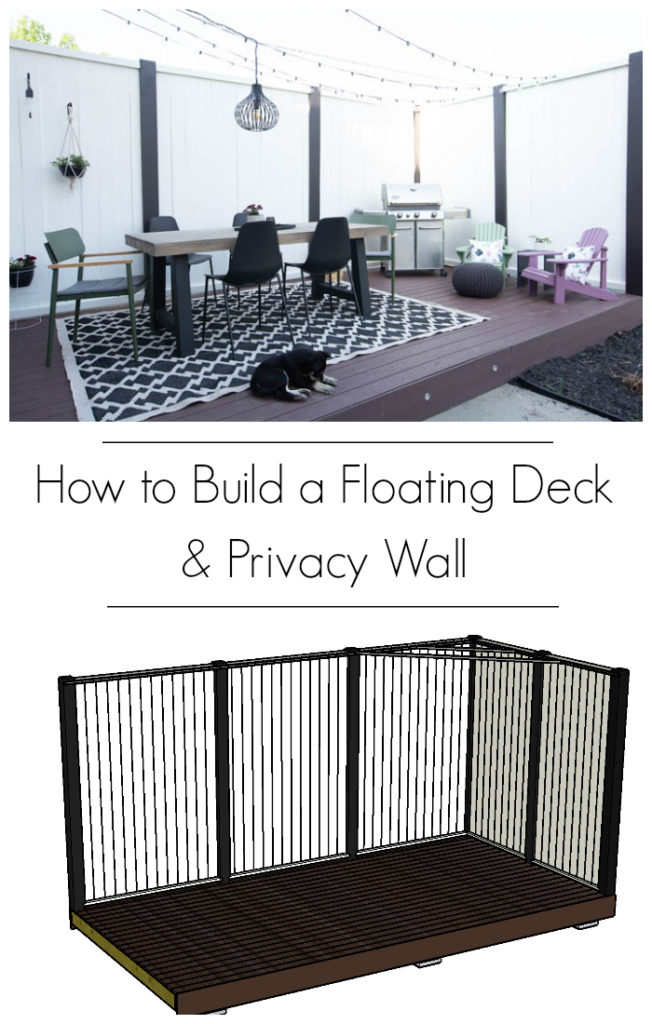
Learn how to build a DIY floating deck and privacy wall! Great tutorial for this backyard makeover idea that will transform your backyard!
When we moved into this home we were so happy to have space. My husband grew up in homes with acres of land and was always itching to get back to it. There are so many beautiful things about living with space like this, but we really didn’t have anywhere to enjoy the views or watch our children play. For the first year we sat on some old lawn chairs and moved them with the sun so we could still have some shade, lol. Russel had this idea to build a DIY floating deck and privacy wall off the side of the house. I immediately loved that idea because it would give us a dedicated space to BBQ, eat meals, and watch the kids outside. The wall gives us some privacy from the neighbours and provides just the right amount of shade throughout the day.
*This post may contain affiliate links. When you buy a product through one of my links, I get a commission at no cost to you! Thanks for supporting my blog so I can continue to bring you posts like these. For more info, please see my disclosure page.*
It took us only a couple of days (a weekend) and a few trips to home depot to build this deck. Because we used composite decking for our floating deck, we had to order the decking and then wait for it to arrive in the store before we could put it up, but we had the frame already built when it arrived.
We actually built the entire deck at the end of last summer and didn’t get a chance to share the build plans until now. We shared a lot of the process on Instagram. If you want to check out the videos showing how we built the deck, they may help give some context to the build and design.
Everything you need for this DIY Floating Deck and Privacy Wall
Tools Needed:
- Shovels
- optional – skid steer, tractor, etc. to help dig out material and place gravel.
- Rake
- Level
- Post level
- Pry bars
- Table saw
- Dado blade
- Compound Mitre Saw
- Drill and impact driver
- Ladder
- String level
- Welder (to weld bracing structure, you could also the brace fabricated or use a different material)
- optional – Construction level to level out the pad of the deck
- Paint Sprayer (depending on finish type)
Materials Needed:
- Landscaping or geo-textile fabric
- Gravel
- Concrete pads
- 2×8 boards
- Decking (we used Veranda 20′ Composite Capped Grooved Decking – Chestnut Brown)
- Decking facia (we used Veranda 12″ Composite Fascia Chestnut Brown – 11 1/4″ x 1/2″)
- 6×6 treated or cedar posts (we used 6×6 x 10′ treated timber posts)
- 2×6 treated or cedar boards for top and bottom rails (we used 2×6 x 8′ treated timber boards cut to length)
- 1×6 fence panels (we used 1×6 x 10′ rough cut boards cut to length – we got these from a local saw mill but you can get 8′ long boards from mosts hardware supply stores and can customize your fence to make these work as well)
- 1″ square steel tubing (we used this to brace the top of our privacy fence to help secure and stabilize the tall posts)
- Exterior Construction Adhesive
- Screws
- Concrete screws (if attached to side of house)
- Paint or stain (depending on finish type and wood choice)

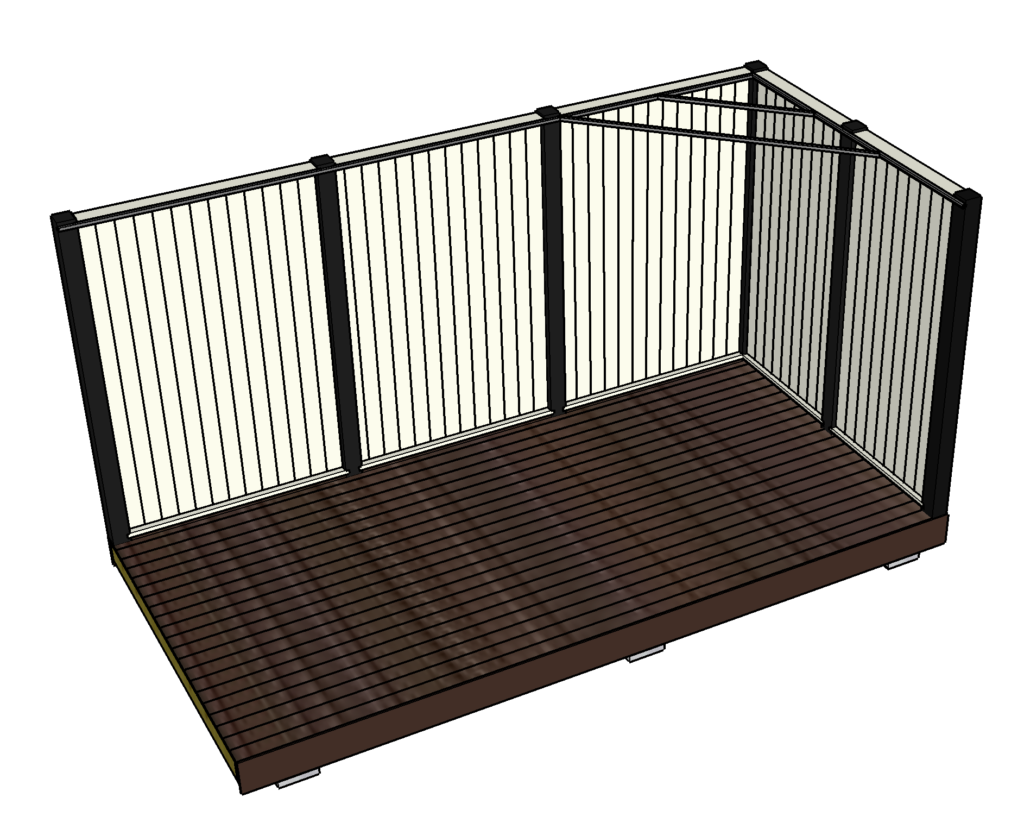
How to Build Your Floating Deck and Privacy Wall
Many of the factors in building your floating deck will be specific to your home and lot. We will go through the details and some of our measurements, but there may be changes that you need to make depending on location of your own deck.
The first step is to determine where you want to build your floating deck. After we had lived at our home for about a year we knew exactly where we wanted to have a eating space, bbq area, and out door longing space off the back of the house. You are also going to want to look into regional building codes/area requirements in regards to setback requirements, fence height restrictions, and even aesthetic restrictions to ensure you don’t get in trouble once your deck is completed. If you have to do any digging also ensure you have utilities located. The last thing you want to do is hit a gas line when you dig into the ground.
Prepping Your Lawn for Your Freestanding Deck
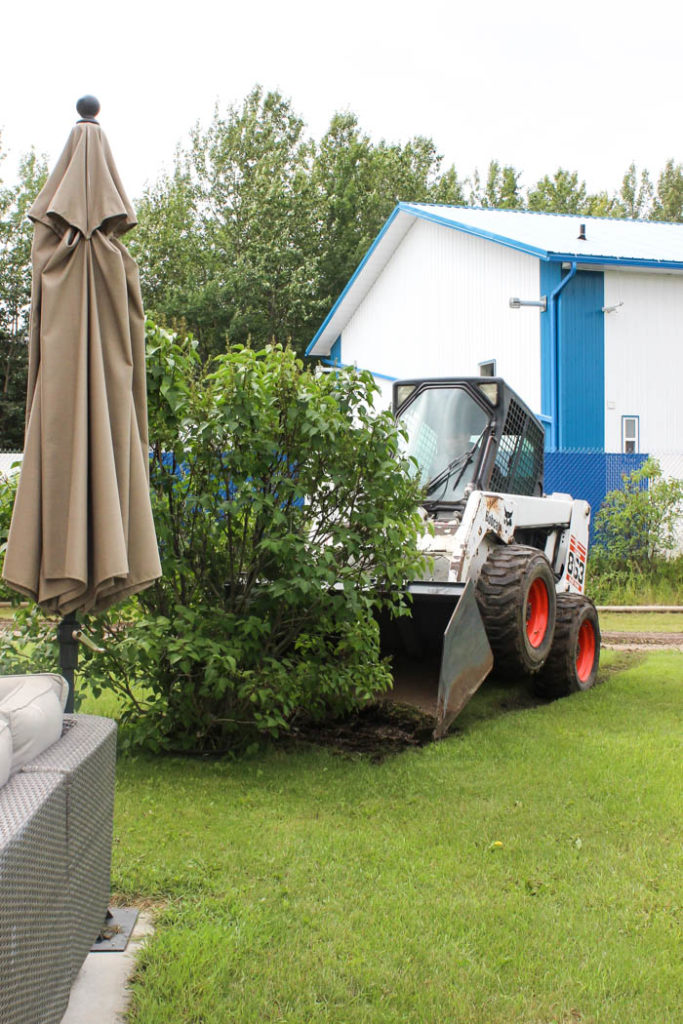
Next, you will need to remove any bushes, trees, gardens, etc that may be in the way of your soon to be new deck. We had a lilac bush we needed to dig out, lucky I was able to borrow my brother’s skid steer to remove it out. But if heavy equipment isn’t available you can use saws to cut down the bush/tree and good old hard work to dig and pull the roots by hand.
With everything out of the way we started by stripping all the topsoil back and digging down to clay. Depending on the area you are building the deck in you will want to ensure that water is graded (or on a slope) away from your house, concrete pads, etc and won’t pond near your deck.
At this point you will want to determine the final height of your deck as well. You will need to take account the thickness of your decking (in our case 0.94″), your stringer or joist height (we used a 2×8 so this was 7 1/4″ for us), the thickness of the gravel being place (our gravel was approximately 4″ thick), and the spacer used between the deck structure and the concrete pad (we used treated 6×6 post cut to various lengths to level out our deck). We were building beside a existing concrete patio pad, so we ended up just cutting out approximately 4-5″ of material.
With the topsoil removed you can smooth out the clay and place your landscaping fabric/ geo-textile material. Essentially what the geo-textile material does is provide a base to hold and stabilize the gravel and prevents weeds from growing through the fabric, under your deck. You can key in the edges with top soil around the perimeter of the fabric to hold it into place.
With the fabric in place you can now put gravel down. The gravel allows water to drain away from your deck (assuming the soil beneath is graded/sloped properly). We also used gravel because it is easier to level out than soil when you get to installing your concrete pads, and eventually the deck structure, and weeds don’t grow in it. We had a gravel truck deliver a load of 3/4″ crush gravel from a local gravel pit for our project. With the gravel in place level out the gravel with a rake and compact. To compact you can use a plate tamper, a hand tamp, or a larger piece of equipment.
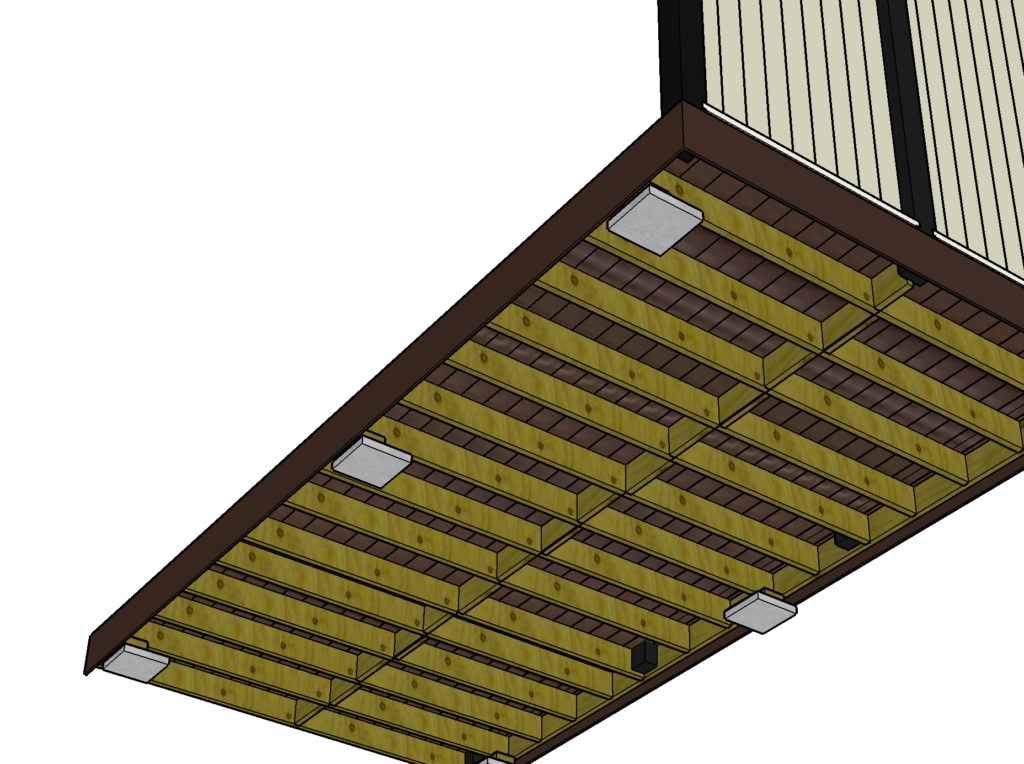
Placing Your Concrete Pads for the DIY Floating Deck
You can now place your concrete pads at all corners and center of the deck. Our deck was 20′ long by 10′ wide. We supported it at six points (ends and middle). I wouldn’t have the spaces between supports larger than 8′. Level out your pads – you may need to remove and re-install the pad a couple times by adding/removing material to ensure the pads are completely level. You can also use a pry bar to help lift the pad and add/remove material as required. I used a construction level and level to confirm the pads were all good before moving on. You will want the top of the concrete pads slightly higher than the surrounding gravel material as well (you don’t want water ponding on the concrete under the floating deck as this may eventually rot the 6×6 support posts).
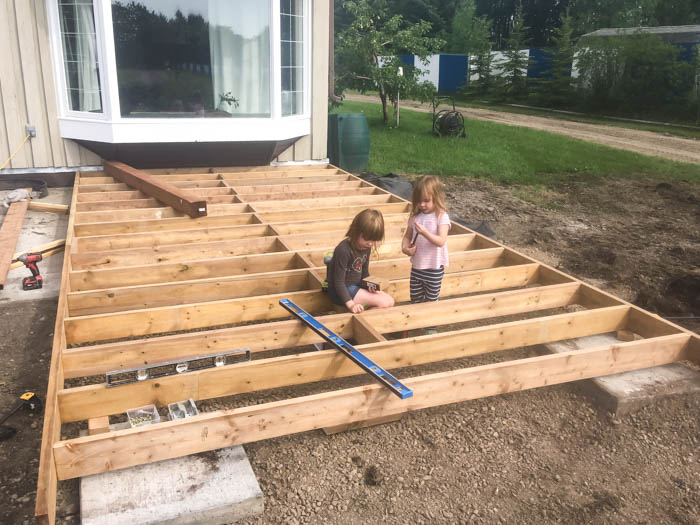
Build Your Floating Deck Frame
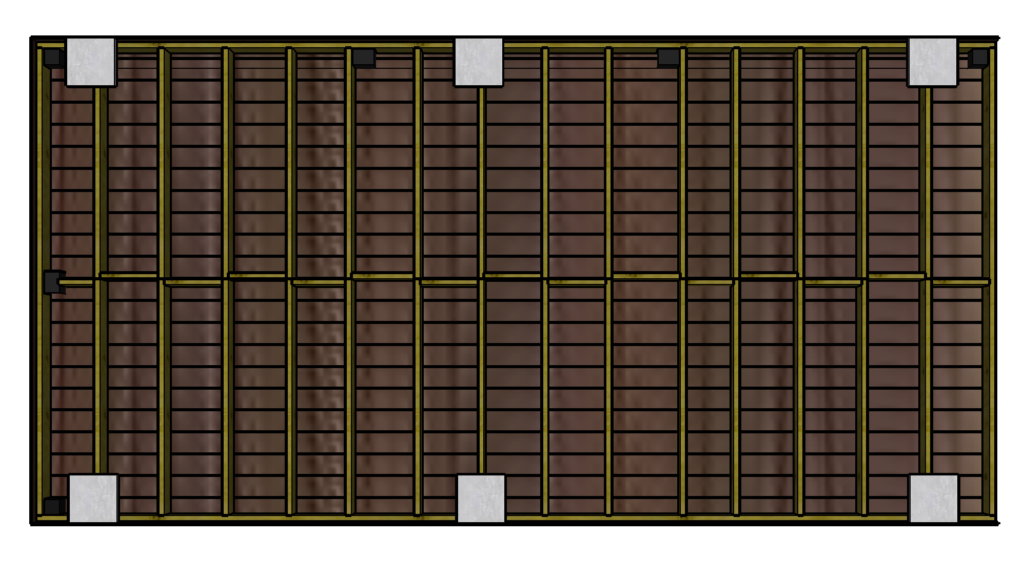
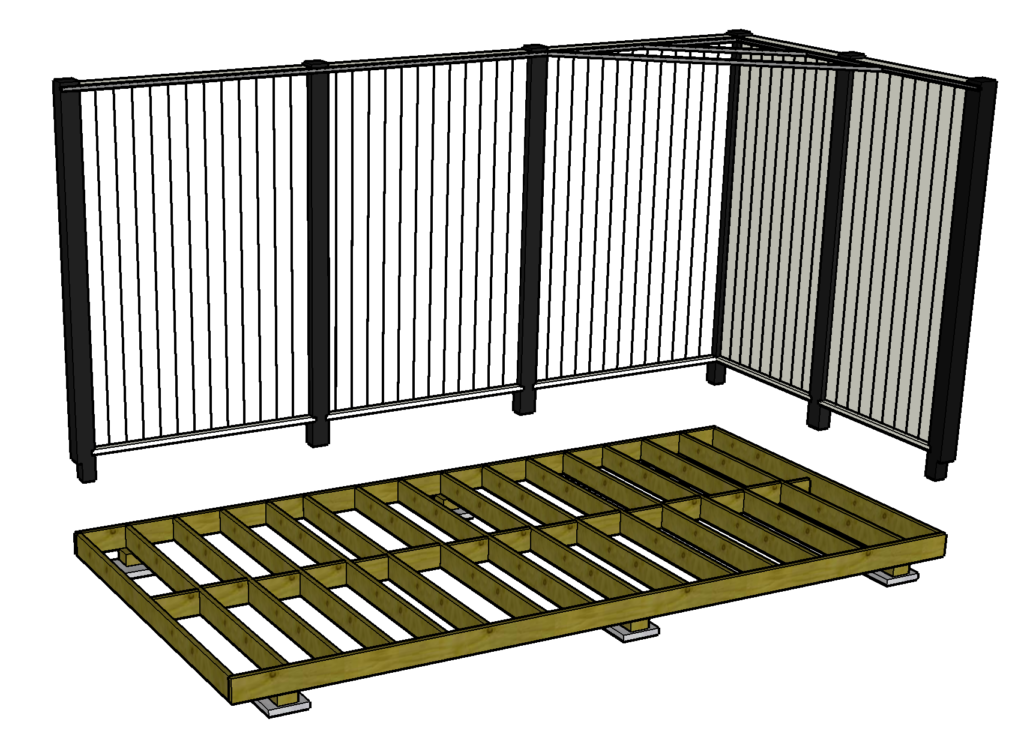
With the pads level you can begin building your deck. We started out by laying out the perimeter boards and than the stringers/joists in the middle. We used 2×8′ by 10′ long treated timber boards. Cut your boards to length, as required, prior to laying them out. All the stringers/joists are on 16″ centers. There were a couple exceptions where the privacy wall posts spacing was in conflict with the stringers/joists were and the joist needed to move to either side of the privacy wall posts. With the deck framed I added blocking to the center of the deck as shown in the photo
You can now set your deck to its final height. I used 6×6 treated timber blocks on top of the concrete pads to raise the deck off the gravel/concrete pads. I installed the deck level because drainage or slope on the deck isn’t really a concern since the deck boards are set in place with a 3/16″ gap between all the boards. You can cut the blocks between the concrete pad and the stringers/joist to custom heights as required to level the deck out. Once the deck was levelled I screwed the blocks into the joists. I also lagged the one end board into my house via concrete screws as the one side of the deck sat against my house.
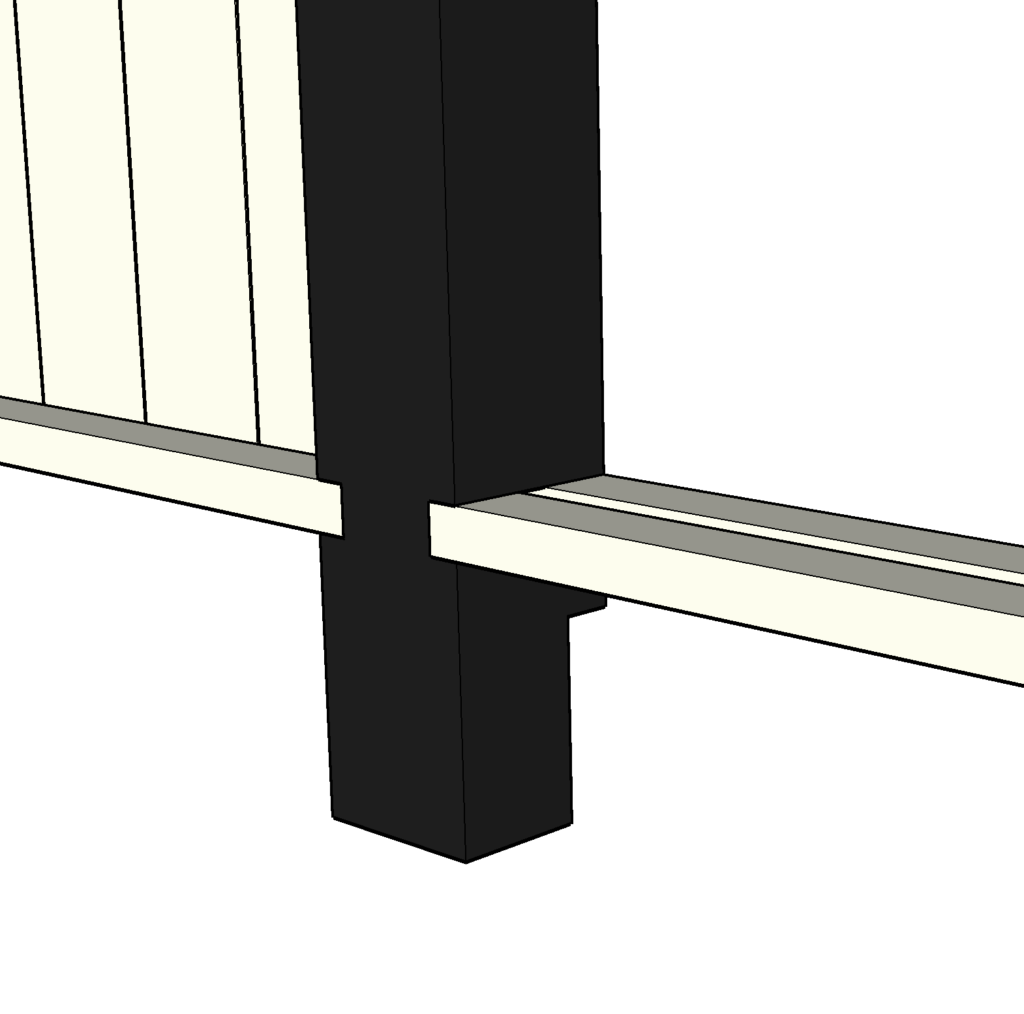
Making Notched Posts for the Privacy Wall
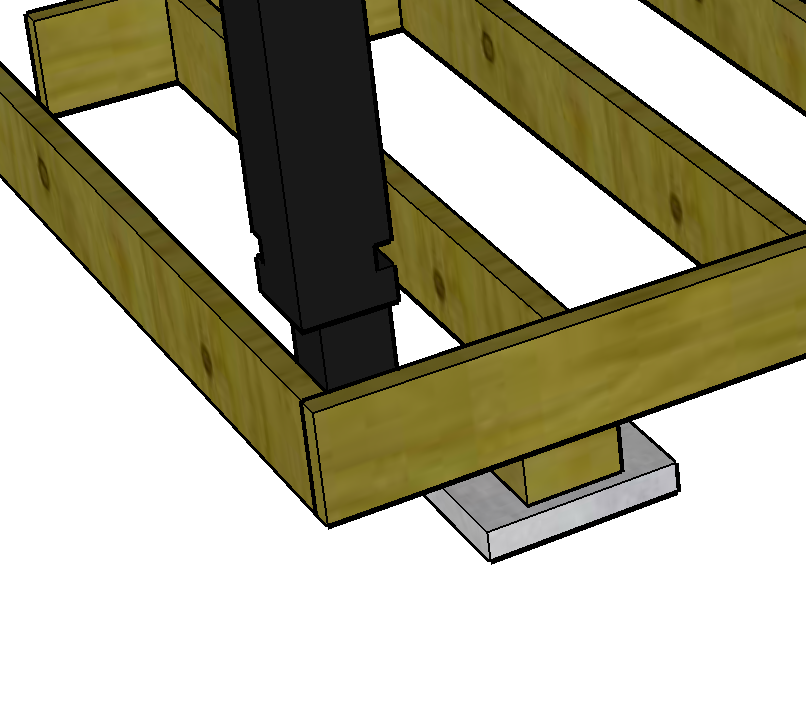
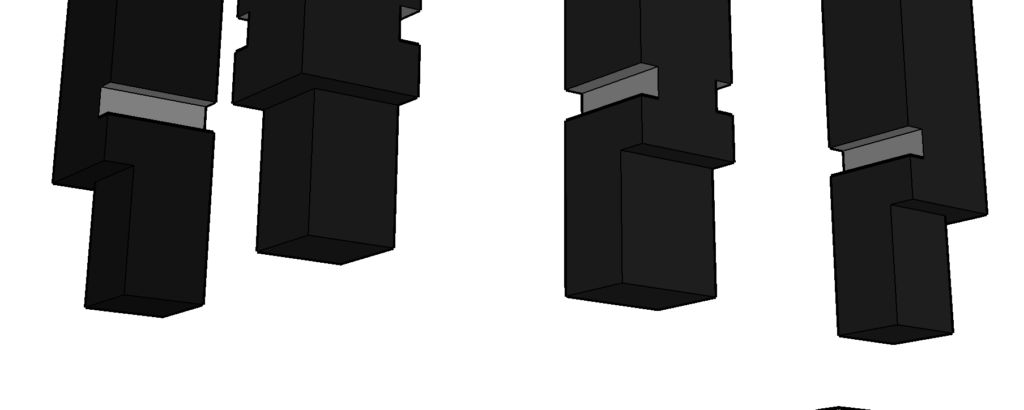
With the floating deck sub-structure built I moved on to the privacy wall. We began with notching all my posts as shown in the pictures above. You can see in the larger photos that the notches are needed to allow the rails to sit in nicely, and allow the privacy wall to sit on the deck.
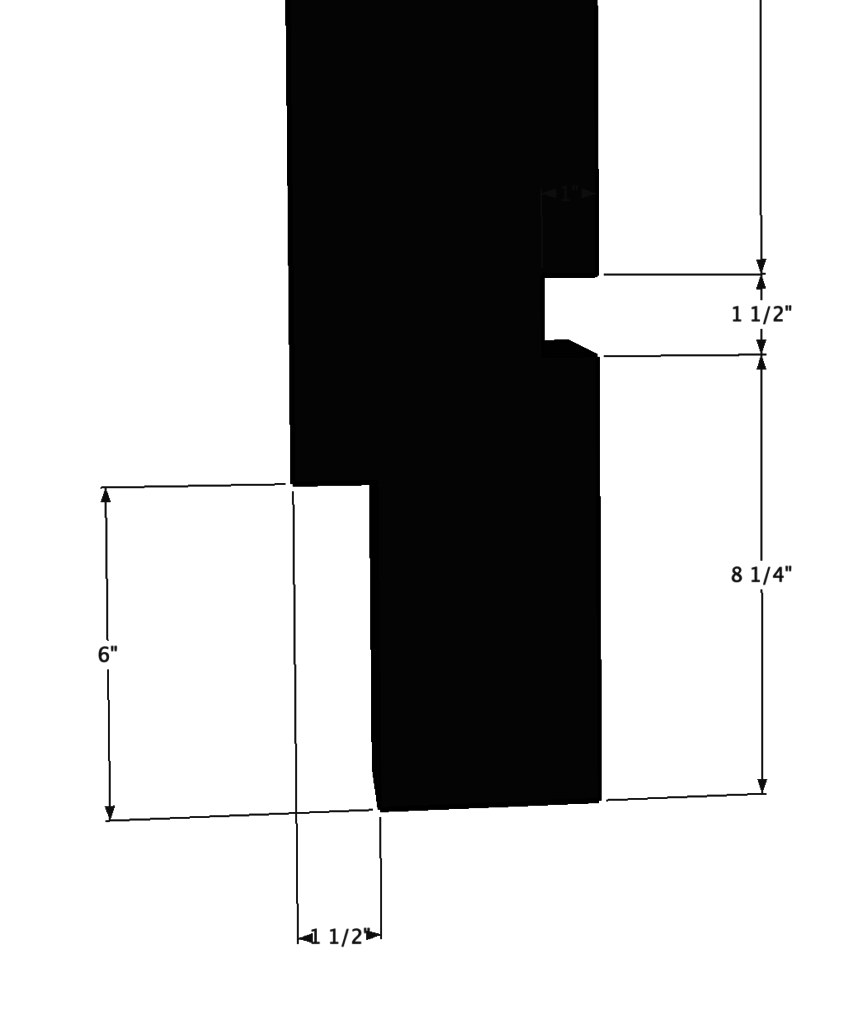
The notch at the bottom of the post was 6″ deep by 1 1/2″ wide to allow the post to sit flush on the deck edges. Depending on the location of the post the notch type/position may vary so pay attention to posts location.

We than cut the notches on the side(s) of the posts to allow the top and bottom rail to be installed (where the fence slats/boards will eventually be installed.
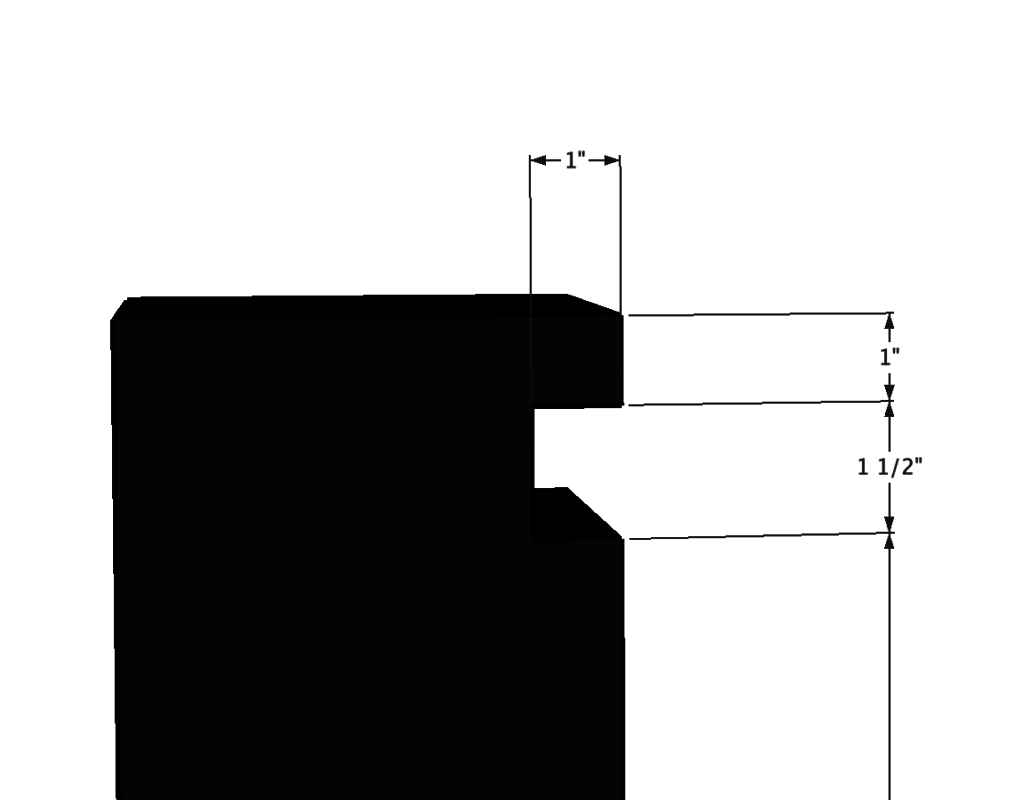
Here (above) is what the top of the post looked like after the notches for the rails and the substructure were completed.
Making The Rails and Fence Slats
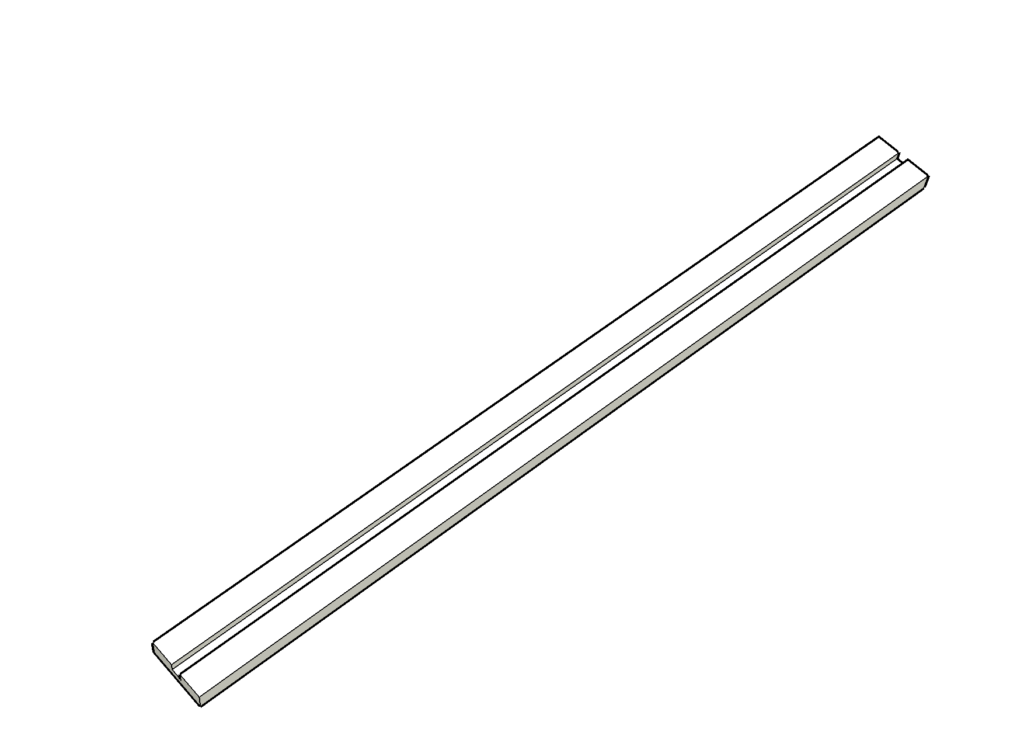
With the posts notched and cut to length we moved onto the rails. I ran the 2×6 through my table saw using a dado blade (set to the thickness of the fence slats) to cut a slot in the middle of the board (shown in the photo above). I cut the slot approximately 1/2 – 3/4″ deep.
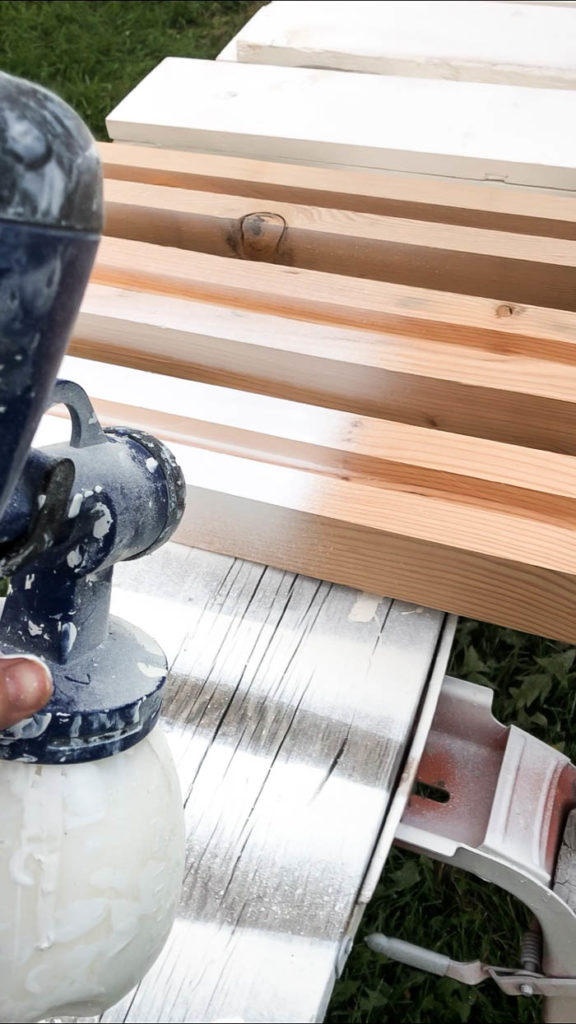
With my rails and post cut we coated them with primer and than painted the posts black and rails and fence slats white using our Homeright paint sprayer.
Since there were so many boards, and so many coats of paint needed, we knew that the Paint Sprayer would be the fastest and easiest way to paint them. If you choose to stain them, the sprayer can also spray stain on.
Installing the Privacy Wall
Once the paint dries you can begin installing your posts. I started with the post that sat against the house and I lagged this post into the house to help provide stability to the privacy wall. I used construction adhesive and screws to secure the posts to the deck structure. I also used some temporary bracing to hold the posts in place until the entire wall was built. I used a post level to ensure the posts were installed level and true.
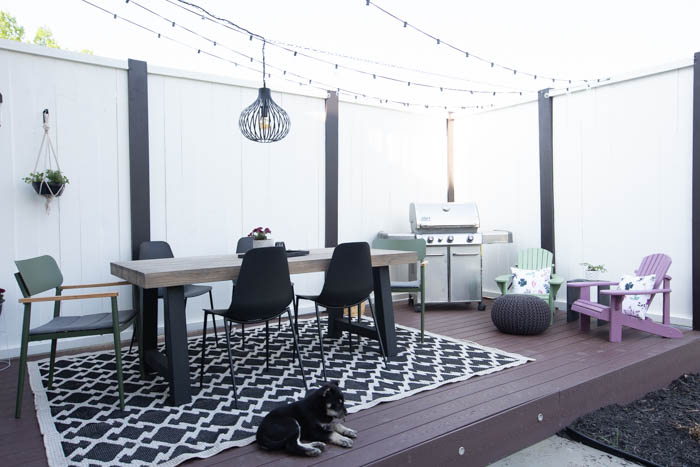
At this point you may want to consider if you need electrical or natural gas in or around your deck. We decided to have our BBQ on the deck so we had a natural gas line run to the far corner. We also wanted to add lighting to the facia on one side and hanging string lights above. To do this we had the electrical and natural gas lines all hidden in the deck sub-structure. Professionals should be hired/used to complete these tasks.

Installing Your Deck Boards
You can now move on to installing the deck boards. We went with the hidden spacers that were recommended by the manufacture to secure the deck boards to the joists. Depending on your deck surface choice follow the manufactures directions for installation. We decided to go with a composite board due to its long life span, durability, and ease of maintenance.
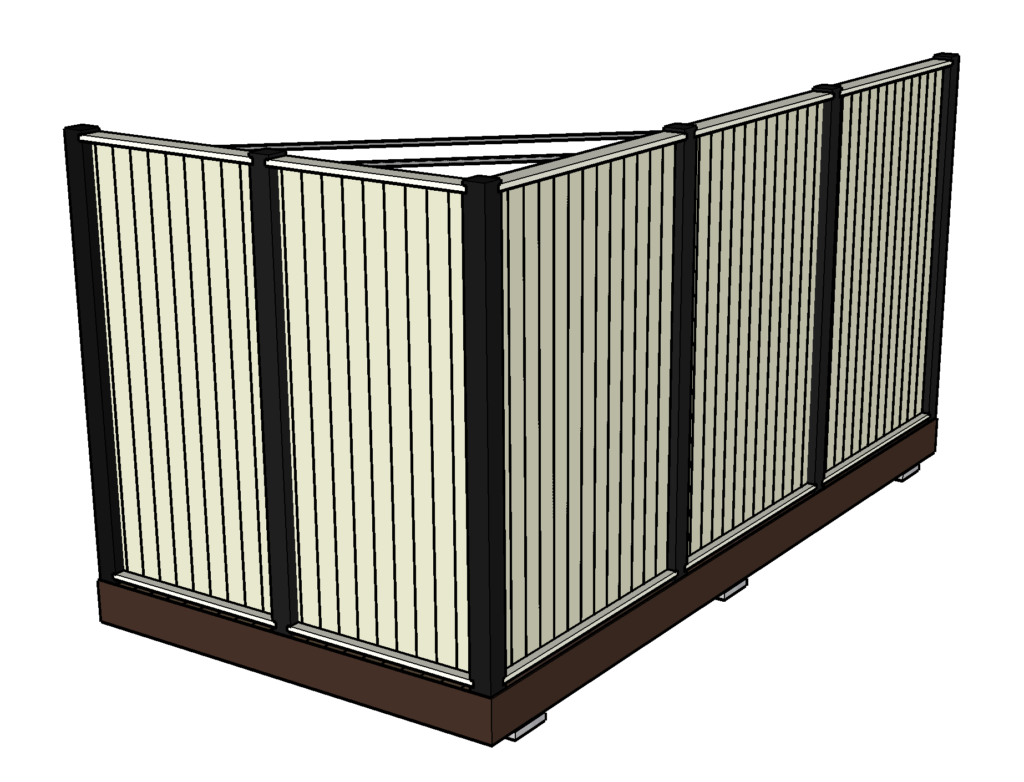
Installing Your Privacy Wall
Once your deck surface is installed you can continue with your privacy wall. I began by installing the top and bottom rails to the posts. I used construction adhesive and screws to attach them to the posts.
With the rails installed you can begin placing your fence boards/slats. You can install them on a angle or by “bowing” the boards to fit them into the slots/grooves on the bottom and top of the rails. I cut all my fence slats to length as I went to ensure the tightest fit possible. The last board(s) can be a bit tricky but I found by “bowing” the boards outwards and using pry bars I was able to install them all. The fence boards just sit in the grooves in the rails, we didn’t use glue or screws to secure them in place.
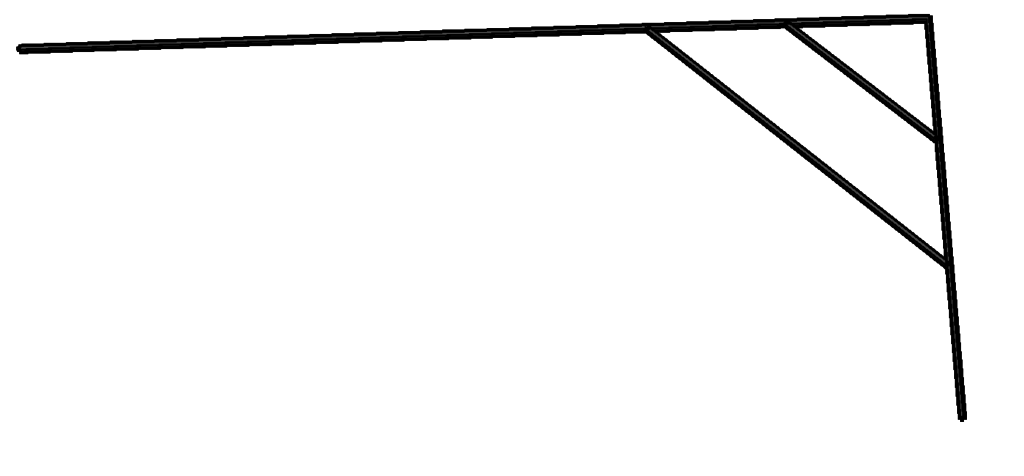
We also added a steel brace at the top of the deck to help stabilize the privacy wall (in the case of high winds or heavy loads leaning against the wall). Our privacy wall was 10′ high so if you go shorter than that it may not be required. We used 1″ square tubing and welded the corner. We added two diagonal braces in at the corner of the deck. This tubing could also be used to run electrical if required after it is installed. The photos don’t show this brace but the build plan drawings do. We ended up installing this after the deck was completed. We lagged the brace to the timber posts.
With all the structure completed you can add the fascia to the edges of the deck. Three out of the 4 sides on our deck were visible to we used fascia from the same decking supplier/manufacture.
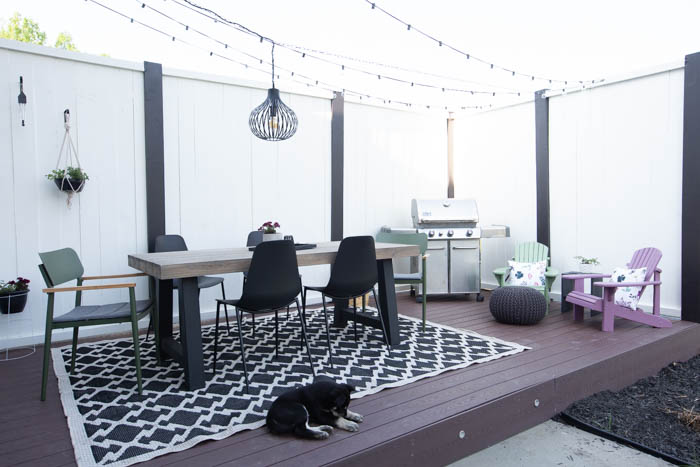
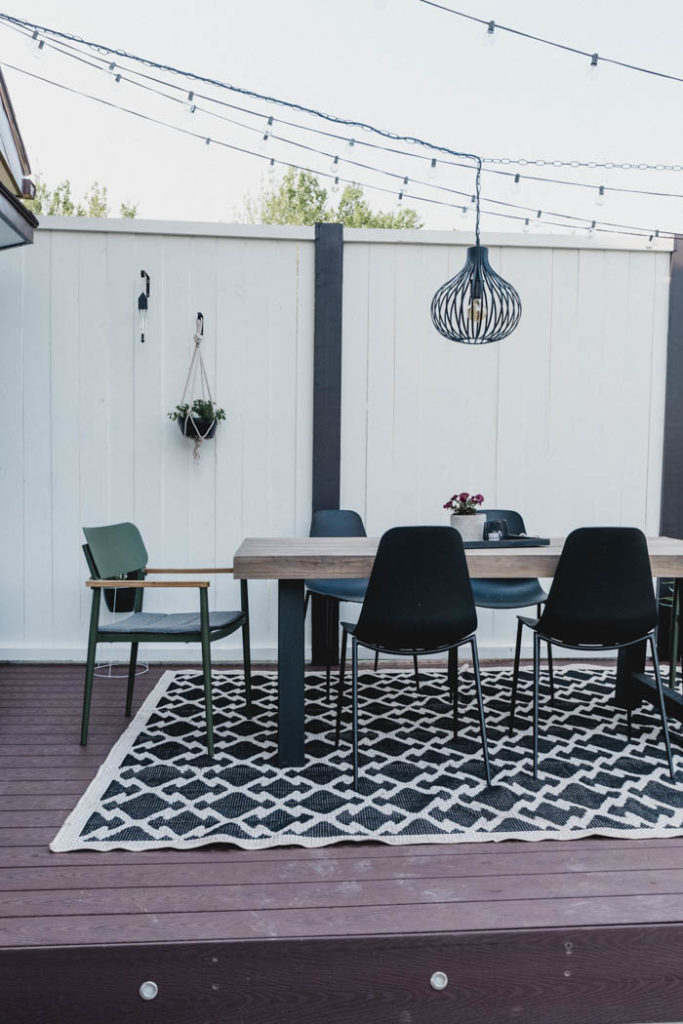
Our Finished DIY Floating Deck and Privacy Wall
This deck was everything we wanted! After choosing some new deck furniture, adding the BBQ, and hanging some string lighting, it was the perfect outdoor oasis for our family! The privacy fence hides everything we didn’t want seen (*ahem*… the neighbours yard), and gives us the privacy we wanted to be able to hang out comfortably on the deck.
A few months after everything was done, we also added a large black planter box to the deck, which worked perfectly with the space!

How to Paint and Maintain Your Fence
There is so much to unpack here! Instead of posting it all here, I’ve shared it in another post about How to Paint Your Wood Fence! Be sure to check that out for more great tips and tricks on painting and staining with a Paint Sprayer!

If you’re looking to make some changes indoors, check out this great DIY Moulding Wall Tutorial!